.jpg?width=50&name=linkedin(1).jpg)


At Synatic, we recently started using Svelte and SvelteKit for our frontend applications. These...
There are quite a few ways to handle auth (authentication and authorization) on the web, each with their own set of considerations and trade-offs. However, most are just some variation or extension of two different main approaches, namely session-based (stateful) auth and token-based (stateless) auth. In this post, we'll focus on how to implement the session-based approach in SvelteKit.
This post assumes some familiarity with Svelte, SvelteKit, Auth0 and other related facets.
Auth recap
Session-based
Session-based auth is all about the process of authenticating and authorizing a user in the context of a session. A session is just a series of interactions between a user and an application for a given timeframe. A session usually starts at the point from which a user is authenticated and continues all the way until the session is ended, usually when the user logs out. During the session, the user is limited only to what they're authorized to do. Keeping track of this session is done by using a special file called a cookie. This cookie is usually stored on the user's browser and is sent to the server with each request. Once the server receives this cookie, the user's ID is extracted and used to retrieve the user's data on the backend / db. This data is then used to determine whether the user should continue to access the requested resource. As you can imagine, this process can become quite a bottleneck once we have a lot of users interacting with the server since you'll need to do a lookup for each request.
Token-based
To get around this issue of having to look up the user's data on each request, a token (usually a JSON Web Token) is stored on the user's device or browser and is sent with each request. In this regard it's similar to a cookie, but where it differs is that instead of having the server look up the user's data on each incoming request, the required data is already contained in the token that was received, so only a simple verification is required to determine whether a user is allowed to continue. Naturally, a question will pop up here, i.e., how does one verify what is "claimed" in the token without looking up the user's data or having the user send across sensitive information? Enter signatures. When a token is generated and saved to a user's device (post login), a signature is generated and saved as part of the token. The creation of this signature is done server-side using a private key (see JWKS).
So once the server receives the token again, the hosted public key is used to verify the incoming signature, and if it matches, it's safe to assume that the token is unaltered and that it was issued by the same server / domain and can therefore be trusted. The permissions / authorizations that the user has is stored in the token as well.
SvelteKit's approach
SvelteKit (not Svelte) takes an opinionated approach to auth, preferring a cookie / session-based approach should any server-side functionality be used. It's not enforced though, but encouraged by the fact that it allows you to easily pull out cookie information for verification / authorization.
Generally this works well, but it assumes that one would be using the session-based method.
Auth0
Auth0 is a great tool as it takes a lot off of the developer's shoulders regarding auth and login, however, at the time of writing this article, there was no clear guide to integrate Auth0 with SvelteKit, especially in the context of SSR or server-side functionality. However, that wasn't the end of the road.
Auth0 SvelteKit SSR integration
Should one really need to integrate Auth0 with SvelteKit and still use cookies, there are some interesting conundrums that'll pop up. Some of which include the challenge of obtaining the Auth0 token on the server side while only having access to the cookies object. Another challenge includes managing the token lifetime (TTL) relative to any potential cookies and their lifetimes.
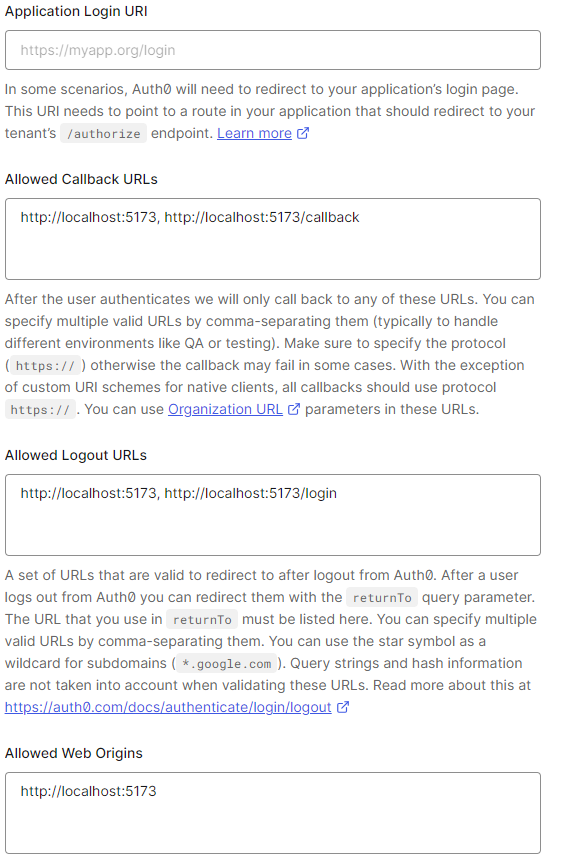
On Auth0, start off the project with the Single Page Web Applications template. Set up any relevant configuration for the app. In our case, we included a /callback route for the post-login session setup. This is your app route that a user is redirected to after logging in.
Install the Auth0 SPA library:
npm install @auth0/auth0-spa-js
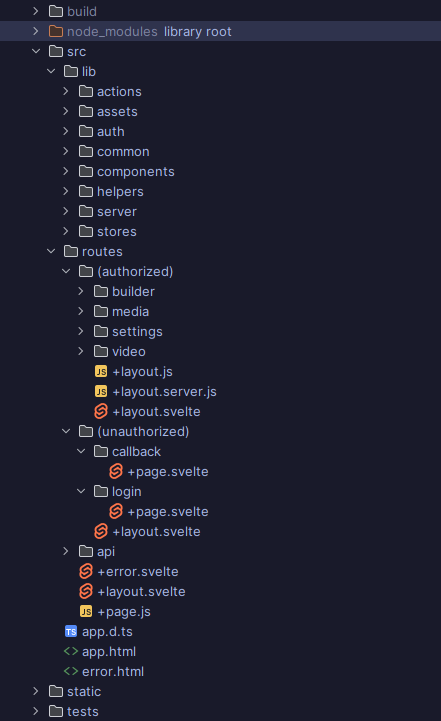
Set up your pages / routes, this is our structure:
Set up your initial landing / login pages:
// src/lib/auth/index.js

import { createAuth0Client } from "@auth0/auth0-spa-js";

import {
  PUBLIC_AUTH0_DOMAIN,
  PUBLIC_AUTH0_CLIENT_ID,
  PUBLIC_AUTH0_AUDIENCE,
} from "$env/static/public";

async function getAuthClient() {
  const authClient = await createAuth0Client({
    domain: PUBLIC_AUTH0_DOMAIN,
    clientId: PUBLIC_AUTH0_CLIENT_ID,
    authorizationParams: {
      audience: PUBLIC_AUTH0_AUDIENCE,
    },
  });

  return authClient;
}

export { getAuthClient };
// src/routes/(unauthorized)/login/+page.svelte

<script>
  import {
    getAuthClient
  } from '$lib/auth';

  import {
    PUBLIC_AUTH0_REDIRECT_URI
  } from '$env/static/public';

  import {
    Logo
  } from '$lib/assets/svg';

  import {
    Button
  } from '$lib/components';

  const login = async () => {
    const client = await getAuthClient();

    await client.loginWithRedirect({
      authorizationParams: {
        // Redirects to your /callback page
        redirect_uri: PUBLIC_AUTH0_REDIRECT_URI
      }
    });
  };
</script>

<div class='container'>
  <div class='background'>
    {#each [...Array(200).keys()] as i}
      <div class='light' />
    {/each}
  </div>
  <div class='card'>
    <div class='top'>
      <Logo
        style='width: 192px; height: 32px; background-color: var(--background-color-2);'
        textStyle='color: var(--color-1);'/>
    </div>
    <div class='bottom'>
      <span class='text'>
        Media on Demand
      </span>
      <div class='buttons'>
        <Button
          style={'flex: 1;'}
          text={'Login'}
          on:click={login}/>
      </div>
    </div>
  </div>
</div>

// styles
Once the user is logged in, they should be redirected back to your /callback page. On the callback page, some logic will be required to establish the session, i.e., set the cookies:
// src/routes/(unauthorized)/callback/+page.svelte

<script>
  import {
    onMount
  } from 'svelte';

  import {
    goto
  } from '$app/navigation';

  import {
    getAuthClient
  } from '$lib/auth';

  import {
    auth
  } from '$lib/stores';

  import {
    Spinner
  } from '$lib/components';

  let authClient = null;

  onMount(async () => {
    const client = await getAuthClient();
    const isAuthenticated = await client.isAuthenticated();

    if (!isAuthenticated) {

      await client.handleRedirectCallback();
    }

    const token = await client.getTokenSilently();

    authClient = client;

    // This is posting the token to the SvelteKit backend to create and set a cookie
    await fetch('/api/token', {
      method: 'POST',
      body: JSON.stringify({ token }),
    });

    goto('/media');
  });

  // This will save the authClient to a store once it gets set just after the token is read
  $: $auth = authClient;

</script>

<div class='container'>
  <Spinner/>
</div>

<style>
  .container {
    flex: 1;
    display: flex;
    flex-direction: column;
    justify-content: center;
    align-items: center;

    background-color: var(--background-color-1);
  }

</style>
The POST request goes to:
// src/routes/api/token/+server.js

import { json } from "@sveltejs/kit";

export async function POST({ request, cookies }) {
  const { token } = await request.json();

  cookies.set("token", token, { path: "/" });

  return json({ token: true }, { status: 201 });
}

export function DELETE({ cookies }) {
  cookies.delete("token", { path: "/" });

  return json({ token: false }, { status: 200 });
}
At this point, you might be thinking that simply storing the token in a cookie seems quite problematic since you'll have a difficult time managing the token's lifetime, and you'd be right, but you don't actually need to manually keep track of the token's lifetime.
All that actually needs to be done is to simply check whether the token is still valid using client.isAuthenticated() in your +layout.js file under the (authorized) folder. Should a client token not be valid or have expired, you'll just simply delete the cookie and redirect them to login again.
// src/routes/(authorized)/+layout.js

import { redirect } from "@sveltejs/kit";
import { browser } from "$app/environment";
import { get } from "svelte/store";
import { getAuthClient } from "$lib/auth";
import { auth } from "$lib/stores";
import { unauthorizedRoutes } from "$lib/common";

export async function load({ url }) {
  const path = url.pathname;

  if (!browser) {
    return;
  }

  const client = get(auth) || (await getAuthClient());
  const isAuthenticated = await client.isAuthenticated();

  const isAuthorizedRoute = !unauthorizedRoutes.some(
    (exPath) => exPath === path
  );

  // Keep auth in sync in case the previous reference was lost, e.g., on refresh
  auth.update(() => client);

  if (!isAuthenticated && isAuthorizedRoute) {
    // Remove possibly stale token from cookies
    await fetch("/api/token", {
      method: "DELETE",
    });

    throw redirect(303, "/login");
  }
}
Here, the load function for the layout will be invoked for both the client and server sides, so a browser check is required to get the previously saved auth reference on the client.
Keep in mind that you might need to tweak the behavior to allow this load function to run when it needs to. For example, by awaiting the parent in child routes:
export const load = async ({ parent }) => {
  await parent();

  // code
};
There are some caveats to awaiting parents as per the SvelteKit docs, see loading parent data.
Since the token is now included in the cookie, you should be able to introduce a server-side check for the cookie:
// src/routes/(authorized)/+layout.server.js

import { redirect } from "@sveltejs/kit";
import { unauthorizedRoutes } from "$lib/common";

export async function load({ cookies, url }) {
  const token = cookies.get("token");
  const path = url.pathname;

  const isAuthorizedRoute = !unauthorizedRoutes.some(
    (exPath) => exPath === path
  );

  // The token won't exist if it expired (i.e., DELETED by +layout.js)
  if (!token && isAuthorizedRoute) {
    throw redirect(303, "/login");
  }
}
Keep in mind that doing this simple check above is NOT sufficient to protect your API. Generally, with any token-based implementation, the token signature needs to be verified and perhaps the request permissions as well. In this case, the SvelteKit API layer serves as a lightweight service / parsing layer and communicates with a deeper backend layer that does proper token and permission validation.
Should you need to properly validate the token in the SvelteKit API layer, you'll most likely need look at how the underlying JS libraries can be used to set up validation in a SvelteKit API context. At the time of writing this article, we were not aware of any natural integrations with Auth0 in a SvelteKit API context.
Handling Auth0 token cookies
If you have a backend server that integrates with Auth0 to validate tokens, there should be some way to either configure the middleware to extract the token from the cookie or, in the worst case scenario, it'll need to be manually done, but in our case, we were integrating with a Fastify service where the following configuration was used:
server.register(addAuthentication, {
  domain: env.AUTH0_DOMAIN,
  audience: env.AUTH0_AUDIENCE,
  cookie: {
    cookieName: "token",
  },
});
Here, addAuthentication is a custom authentication plugin to validate the incoming tokens:
import fp from "fastify-plugin";
import auth0Verify from "fastify-auth0-verify";

const plugin = async (fastify, options) => {
  fastify.register(auth0Verify, options);

  fastify.decorate("authenticateRequest", async function (request, reply) {
    try {
      await request.jwtVerify();
    } catch (error) {
      reply.send(error);
    }
  });
};

export const addAuthentication = fp(plugin);
The authenticateRequest decorator will then be registered on protected route hooks:
import { env } from "../../config/index.js";
import { video, imdb } from "../../services/index.js";

export function videos(fastify, options, done) {
  fastify.addHook("onRequest", fastify.authenticateRequest);
  fastify.addHook("onRequest", fastify.authorizeRequest(["read:videos"])); // Permissions

  fastify.get("/videos", async function (request, reply) {
    // code
  });

  fastify.get("/videos/:id", async function (request, reply) {
    // code
  });

  done();
}
Important considerations
Should the session-based approach be followed, keep in mind that it's normally applied between an auth server and the user. Should any requests not go via the auth server, they'll need to be rejected, unless you really want to replicate the auth logic in each service / server.
The token-based approach is generally more microservice friendly in that the logic required to verify an incoming signature is relatively lightweight compared to a user lookup done by an auth service and therefore is easier to replicate as a module on each service. Because of this, there's less risk if a service is accidentally made publicly reachable. The token will still need to be verified and the permissions checked.